Coming from RegiStax
RegiStax is a trademark of its owner. Helia is not affiliated with, endorsed by or sponsored by RegiStax or its authors; the name is used only to say what this page compares. See Credits, licences and trademarks.
If you sharpen with the wavelets of RegiStax 6 today, Helia's Sharpen step is built to feel the same: six layers, a slider, a sharpen value and a denoise value for each, the dyadic and linear schemes, the default and Gaussian filters, and linked layers. This page maps the controls one to one, shows how the settings from published tutorials carry over, and says honestly where the numbers can only be close.
For a worked example on a real H-alpha capture, see Sharpening like RegiStax.
What can and cannot be matched
RegiStax is closed source, and the authors have not published the arithmetic behind the sliders. Helia therefore matches the behaviour and the ranges that the manual, the author's pages and tutorials describe, not the code. The layers, the schemes, the filters and the linking work the same way in kind. The size of the effect of one slider value is Helia's own calibration: it was set so that the values tutorials quote (a sharpen of 0.1 to 0.25 on the fine layers at a slider of 100%) give a firm result on a solar stack and that the top of the range reaches the 10x to 100x that a soft stack sometimes needs. Expect a setting to carry over approximately; look at the picture, not the number, and if you have both programs, compare the two on the same stack.
The sources used:
- The RegiStax 6 pages by Cor Berrevoets: Wavelets, Denoise and sharpen and Linked wavelet layers: the controls, the default of 0.00 for denoise, the linked layers, the schemes.
- The SharpCap guide Processing with RegiStax: dyadic scheme, Gaussian filter, the order of layers 2, 1, 3, and example values (sharpen 0.130, 0.140, 0.110, denoise 0.15, 0.20, 0.10).
- Sky at Night, Wavelets in RegiStax: linear scheme, initial layer 1 and step 0, a first denoise of 0.05, linked layers for the Moon.
- Planetary Astronomy and Imaging, Finalising processing with RegiStax 6: sliders to 100% and beyond with the sharpen filter (layer 1 at 140, layer 2 at 110), denoise arrows stepping by 0.05 and typed values to 0.01.
- Astroforumspace, How to process the planets, part 2: the slider as the share of the layer's sharpen and denoise that is applied, dyadic layers at 1, 2, 4, 8, 16, 32 times the first, the linear scheme's initial layer and step, sharpen and denoise examples.
The controls, side by side
| RegiStax 6 | Helia (Sharpen step, Wavelets) | --wavelets key |
Range and default |
|---|---|---|---|
| Wavelet scheme: Dyadic or Linear | Dyadic or Linear chips | scheme=dyadic, scheme=linear |
Dyadic |
| Initial layer | Initial layer | initial=N |
1 to 8, default 1 |
| Step increment | Step (Linear only) | step=X |
0 to 8, default 1 |
| Wavelet filter: Default or Gaussian | Default or Gaussian chips | filter=default, filter=gaussian |
Default (the B3 spline) |
| Layer 1 to 6 slider | Amount % of the layer | first number of lN= |
0 to 200, default 100 |
| Sharpen | Sharpen | second number of lN= |
-0.1 to 1, default 0 |
| Denoise | Denoise | third number of lN= |
0 to 1.5, default 0 |
| Use linked wavelet layers | Linked chip | linked=on |
off |
| Reset wavelets | Reset to recommended | ||
| Load scheme, Save scheme | My presets (name, Save, click to load) | --edits NAME |
|
| Automatic (re-process on every change) | Always on: the preview follows every slider | ||
| Do all | Always: the export is made from the full-size stack |
There are six layers on the screen. The command line and the API accept up to
eight (l1 to l8).
How a slider value turns into a result
Each layer has a gain g and a noise cut t (in noise standard deviations,
measured from the layer itself):
The layer's detail is reduced by t noise sigmas (anything weaker is taken to
be noise and removed) and then multiplied by g. A sharpen of 0 and a denoise
of 0 leave a layer exactly as it was. The slider (Amount) scales both,
exactly as the RegiStax authors describe the slider ("how much of the sharpen
and denoise is applied"): 100% is the full value, 50% is half the boost and half
the cut, 0% switches the layer off, and more than 100% pushes further, which
is what RegiStax users do with the sharpen filter to go beyond 100.
The sharpen scale is deliberately quadratic, so the values tutorials use have fine control and the top of the range is far-reaching:
| Sharpen | Gain at 100% | at 200% |
|---|---|---|
| 0.05 | 1.25 | 1.5 |
| 0.10 | 2.0 | 3.0 |
| 0.14 | 3.0 | 4.9 |
| 0.25 | 7.3 | 13.5 |
| 0.50 | 26 | 51 |
| 1.00 | 101 | 201 |
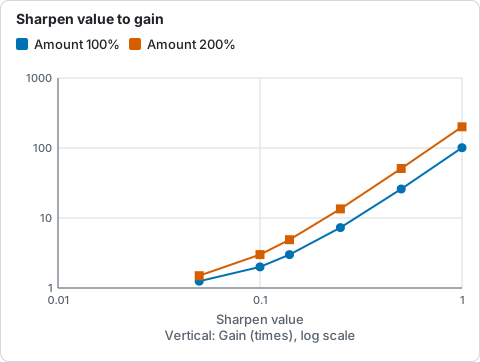
Gain of a layer at amounts of 100 and 200 per cent for each sharpen value, from the table above.
Denoise 0.05 is a cut of half a noise sigma (a light touch), 0.20 is two sigma (typical), 0.30 is three, and 1.5 is fifteen (it removes the layer). The RegiStax value you would type, 0.15 or 0.20 on the fine layers, lands where you expect.
The tutorial settings, translated
| Source | In RegiStax | In Helia |
|---|---|---|
| SharpCap guide, Jupiter | dyadic, Gaussian; layer 2 at 100%, sharpen 0.130, denoise 0.15; layer 1 at 100%, 0.140, 0.20; layer 3 at 50%, 0.110, 0.10 | registax:l1=100/0.14/0.20,l2=100/0.13/0.15,l3=50/0.11/0.10,filter=gaussian |
| Astroforumspace, linear example | linear, initial 1, step 0, Gaussian; sliders 100, 90, 80, 70, 60, 50%; sharpen 0.200, 0.150, 0.130, 0.130, 0.110, 0.110; denoise 0.15 on layers 1 to 3 and 0.10 on layers 4 to 6 | registax:l1=100/0.20/0.15,l2=90/0.15/0.15,l3=80/0.13/0.15,l4=70/0.13/0.10,l5=60/0.11/0.10,l6=50/0.11/0.10,scheme=linear,initial=1,step=0,filter=gaussian |
| Planetary Astronomy and Imaging | layers 1 and 2 taken to 100% and then past it with the sharpen filter, to "140 and 110" | an Amount above 100: registax:l1=140/0.14,l2=110/0.13,filter=gaussian (the denoise is yours to add) |
The first row is the one used in the Sharpening like RegiStax tutorial, on a real H-alpha stack.
Differences worth knowing
- Solar images are not planets. RegiStax tutorials are written for planets on a dark sky. A solar disc has a hard limb and a huge range of brightness, so the same layer boost rings at the limb sooner. Use Helia's limb darkening flatten before sharpening, and keep the limb and sunspot guard on if you use deconvolution (see Sharpening and adjustments).
- The noise cut is measured, not fixed. The noise of every layer is estimated from the layer, so a denoise of 0.2 means the same thing on a quiet stack and a noisy one.
- No RGB align or balance. Helia sharpens the mono stack before any colour. Aligning and balancing the colour channels is a different step (see True colour).
- Everything is non-destructive. The settings are a list applied to the stack for the preview and again at full size on export. You can come back and change a layer; nothing is baked in.
On the command line and in the API
helia stack capture.avi -o out.tif --preset ha \
  --wavelets registax:l1=100/0.14/0.2,l2=100/0.13/0.15,l3=50/0.11/0.1,filter=gaussian
--wavelets implies --sharpen wavelet. Layers you do not name are left alone.
helia edit stack.fits -o out.tif --wavelets ... does the same to a stack you
already have. In the API, give the same text as wavelets in the job
configuration, or an edits entry
{"op": "wavelet", "scheme": "dyadic", "filter": "gaussian", "layers": [{"amount": 100, "sharpen": 0.14, "denoise": 0.2}]}.
The reference lists every key: CLI, API.