Tutorial: true colour from a raw colour camera
Goal: a colour picture of the Sun as the camera saw it, made by stacking the red, green and blue planes of a raw colour capture on one alignment, with the channels registered to each other and the white balance set.
You need: a capture from a colour camera that is a raw Bayer mosaic (a SER with a Bayer ColorID, or an AVI with a SharpCap sidecar that says so), taken in broad-band light: white light with a solar filter. True colour is not for narrow band filters, and the last part of this page shows why. The reference text is True colour; this is the worked example.
The capture and why
The project has no white-light capture of its own yet, so two kinds of real capture are used, and the page says which is which.
14_42_57.avifrom the 2022-07-17 set: a ZWO ASI482MC, 1920 x 1080, 8-bit, 630 frames, exposure 0.64 ms, gain 0, with the SharpCap sidecar14_42_57.CameraSettings.txt(it saysColour Space=RAW8). It is the one broad band capture of the set (the filter is not recorded; the analysis in #121 calls it "broad band, label unknown", and sunspots are visible in it). The disc is cut by the frame (64% of the limb is in view) and the red plane is partly clipped, so it is not a good white-light image, but all three planes carry the disc, which is what true colour needs.Sun_Test.serand15_20_57.ser, same camera, which are H-alpha (they were labelled sodium). Their blue pixels are empty. They are here only to show what Helia does when a channel is nearly empty.
1. Look at the capture first
Header, as written in the file
  FourCC:            DIB
  Format:            Gray8
  Width:             1920 px
  Height:            1080 px
  Sidecar camera:    ZWO ASI482MC
  Colour Space:      RAW8
  Debayer Preview:   On

Helia will use
  Bayer pattern:     RGGB           (sidecar)
  Row order:         top to bottom  (header)
Bayer pattern: RGGB (sidecar) is what true colour needs. A capture that shows
none here is refused (see Troubleshooting).
2. Stack
settings: filter not recognised; luminance channel, keep 25%, alignment points 64 px
frames:  630 total, 158 kept, 316 registered
colour:  true colour, gains red 0.950, green 1.226, blue 1.076
         Channel alignment: red moved (+0.08, +0.03) px onto green (confidence 1.00)
         Channel alignment: blue moved (-0.12, -0.06) px onto green (confidence 1.00)
align:   phase correlation (the frame cuts the limb, 64% of it visible); confidence mean 1.00, least 1.00 (sampled)
wrote:   colour.png
The run took 6.6 s on a GPU. Read the colour: block:
| Line | Meaning |
|---|---|
gains red 0.950, green 1.226, blue 1.076 |
The white balance, with the common scale folded in. With the default --white-balance auto the means of red and blue over the middle of the disc (inside 80% of the radius) were brought to the green's, and then all three were scaled together so that the 99.99th percentile of the brightest channel of each pixel is 1: nothing clips |
red moved (+0.08, +0.03) px onto green |
The shift, in x and y, found by phase correlation of the stacked red plane against the green one and applied. This is atmospheric dispersion (red and blue sit a little either side of green when the Sun is low). A shift under 0.05 px is treated as noise and not applied; over 6 px, or with a confidence under 0.3, it is not believed |
confidence 1.00 |
How sharp the correlation peak was, 0 to 1 |
All the colour work is done on one alignment: the frames are scored and aligned on the luminance, once, and the three planes are stacked with those shifts, so the three planes see the same sky. It costs three stacks, which is why this is slower than a single-plane run.
3. Choose the white balance
--white-balance takes auto (the default), off or three gains R,G,B. The same
capture, the same alignment, three balances:
helia stack 14_42_57.avi -o colour.png --colour true
helia stack 14_42_57.avi -o off.png    --colour true --white-balance off
helia stack 14_42_57.avi -o manual.png --colour true --white-balance 1.9,1,1.5
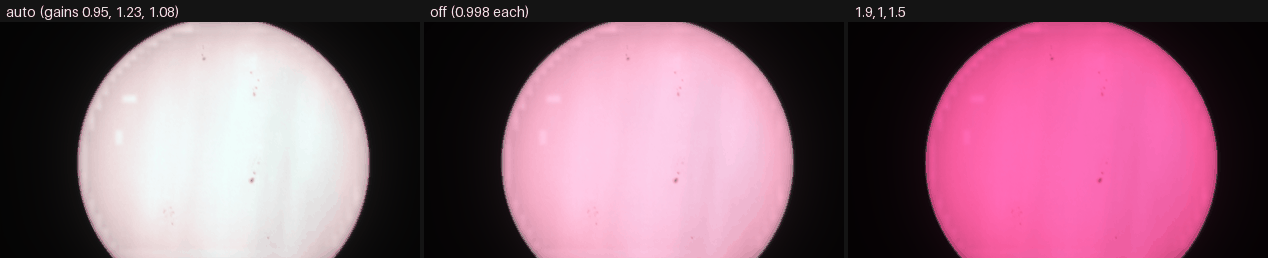
Each picture is written by helia stack as above, then reduced to 420 pixels and
set side by side. The disc is cut by the frame: that is the capture.
| Option | Gains printed | What you see |
|---|---|---|
auto |
0.950, 1.226, 1.076 | The centre of the disc is neutral: white to a very light cyan-grey |
off |
0.998, 0.998, 0.998 | The sensor's own balance: a raw sensor weighs the colours differently from the eye, so the disc is pink |
1.9,1,1.5 |
0.998, 0.525, 0.788 | Your own gains, applied by hand (and then scaled together): strongly magenta, because this capture does not want them |
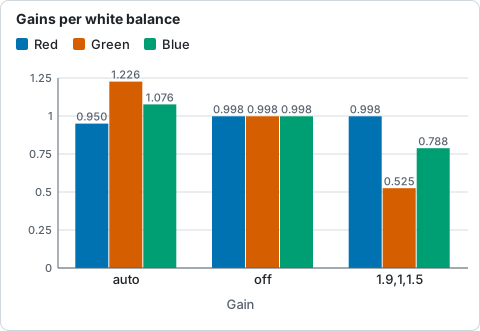
Red, green and blue gains printed for the three --white-balance options on 14_42_57.avi, from the table above.
Use auto unless you know the gains your own sensor and filter need. The
manual gains are for repeating a balance between captures from the same setup.
The gains are always the three numbers in the colour: line, so they can be
written down and reused. (off shows 0.998 for all three because they are no
longer a balance, only the common scale.)
4. Channel alignment
--no-channel-align skips the registration of red and blue to green:
The gains are the same (0.950, 1.226, 1.076) and the Channel alignment: lines
are absent. On this capture the shifts were under 0.15 px, so you will not see a
difference; it matters when the Sun is low and the dispersion is a pixel or
more, which shows as a red fringe on one side of the limb and a blue one on the
other. Leave it on unless the shift Helia found was wrong (see
Troubleshooting).
5. The same in the app
- Open
14_42_57.avi. The Open step shows the Bayer pattern and where it came from. - Go to Stack. Under Colour press True colour. (The chip is greyed out for a capture that is not a Bayer mosaic; hover it to see why.)
- Choose Auto balance or No balance. Align channels (on by default) registers red and blue to green.
- Press Stack N frames. When it has finished the note under the chips gives
the gains and the channel shifts: the same lines as the
colour:block. - Sharpen, Adjust and Export as usual. The edits run on each channel; the Colour step is not used (there is no filter look to choose). Export as TIFF or PNG for an RGB picture, or FITS for a three-plane cube.
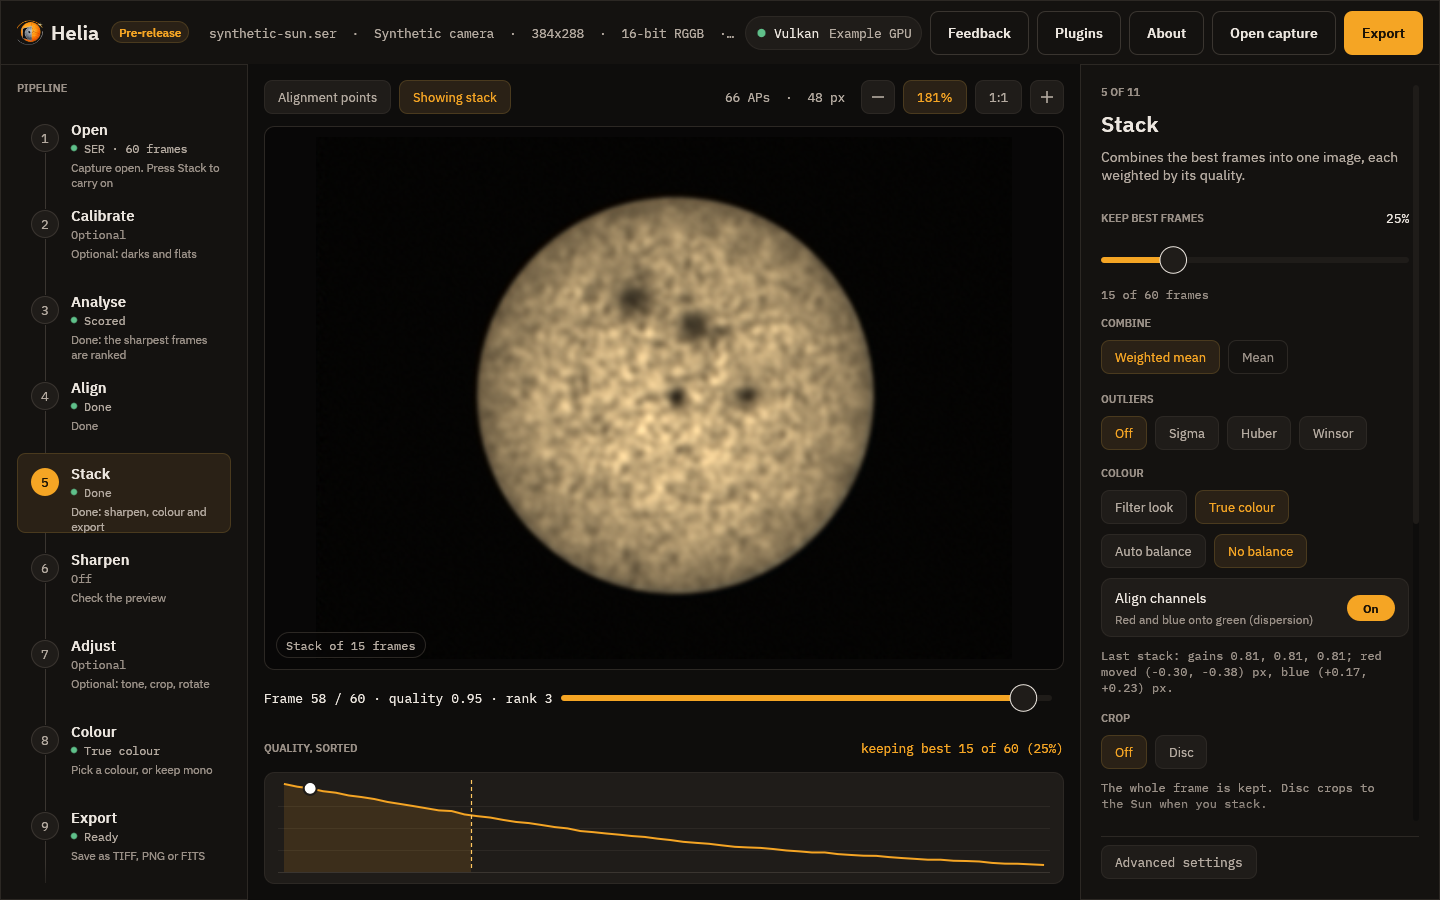
Drawn by the interface test harness on its synthetic demonstration capture, to show the chips and the note. The real result is above. True colour and the other Colour choice are not remembered between sessions: each capture starts from its own recommendation.
What a FITS file holds
writes a three-plane cube (NAXIS = 3, NAXIS3 = 3, CTYPE3 = 'RGB', and a
COMMENT plane 1 is red, plane 2 green and plane 3 blue). The history cards
record the choices:
HISTORY True colour: red, green and blue stacked on one alignment; white balance
HISTORY  automatic (the disc centre is made neutral); gains 0.950, 1.226, 1.076
HISTORY Channel alignment: red moved (+0.08, +0.03) px onto green (confidence 1.00)
See Output formats.
When a channel is nearly empty
The same command on an H-alpha capture, where the blue pixels see almost nothing:
colour:  true colour, gains red 0.984, green 1.045, blue 4.179
         Warning: the blue plane holds far less than the green, so its gain was held at 4; is a narrow-band filter in use? True colour is for white light
         Channel alignment: red moved (+1.36, -0.04) px onto green (confidence 1.00)
         Channel alignment: blue moved (+0.05, -0.00) px onto green (confidence 1.00)
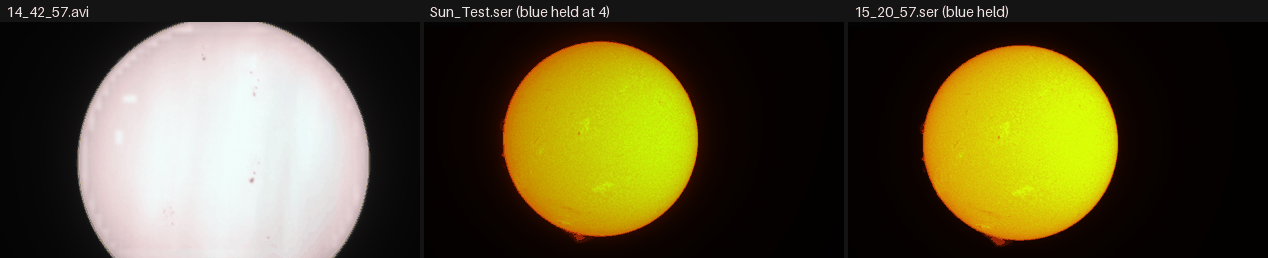
Left: 14_42_57.avi. Middle and right: Sun_Test.ser and 15_20_57.ser, both
H-alpha. The yellow-orange is the red and green planes; the blue plane is held
and carries almost nothing.
What Helia did: the gain that auto would have used for blue (15 to 23 on these
captures) would only have multiplied noise, so it was held at 4 (4.179 and 3.993
here include the common scale) and the warning was printed. The picture is a
yellow-orange disc, which is the red and green planes, not the colour of
anything. The red shift of 1.36 px is also not dispersion: through a narrow filter
the red and green pixels see different things, so the planes disagree. The
conclusion is the warning's: use a filter look instead (--preset ha, the
Colourising page). The nearly-empty-channel case
is reproduced here on real H-alpha captures; the project has no real sodium capture
(the ones labelled sodium turned out to be H-alpha).
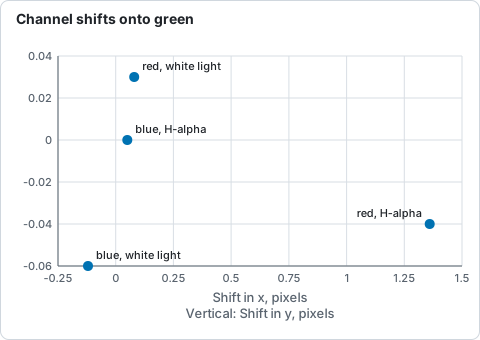
Shift of red and blue onto green found by phase correlation, from the Channel alignment lines of the white-light and the H-alpha captures.
What to expect and how to tell it worked
- A
colour:block with three gains and two channel-alignment lines (or none with--no-channel-align). - In white light with a good exposure, the gains are within a factor of two of each other and no warning appears. Here the three gains are 0.95, 1.23 and 1.08.
- The centre of the disc is neutral grey or white with
auto. A colour cast over the whole disc means the balance is off, or the red or green is clipped: checkhelia infoand the sensor's gain. - A FITS output has three planes; the TIFF is RGB 16-bit, the PNG RGB 8-bit.
Troubleshooting
Run on the captures above unless it says otherwise.
helia: --colour true needs a raw colour capture (a Bayer mosaic); this capture
  is mono or already demosaiced. Use --colour mono, or a preset for a filter
. The capture is mono (a mono camera, or the Bayer data are gone). Verified with a mono capture of the 2026-10-20 set (15_44_48.avi). Checkhelia info: if the header says mono but the camera is a colour one,--bayer rggb(or the pattern of your camera) forces the mosaic. An MP4 or other already demosaiced video is, by the code, refused the same way (not run: the build server has no ffmpeg).helia: --channel, --invert and --colour-strength do not apply to --colour true: it stacks all three channels and has no colour look. Remove those options; the look and the single channel are for filter stacks.Warning: the blue plane holds far less than the green, so its gain was held at 4. A narrow-band filter, or a sensor that is not seeing blue. Use a filter look (--preset) for narrow band, or for white light check the filter and the exposure. It is held at 4 on purpose: a larger gain only boosts noise.- The red and blue are shifted by a pixel or more and the picture has a
fringe. If the shift came with a high confidence and the Sun is low, it is
dispersion and the alignment is correct. If the capture is narrow band (red
moved +1.36 px above), the planes are disagreeing; use
--no-channel-alignand a filter look instead. - The disc is pink or cyan, not neutral. Try
--white-balance auto; a manual balance that was right for another night is wrong for this one (the1.9,1,1.5picture above). If auto is also off, the red or the green is clipped: lower the sensor gain or the exposure and capture again. - A Bayer notice you did not expect (
The SER header says mono...). Helia found a mosaic in a SER that says it is mono, as it did forSun_Test.ser(pixel positions averaging 79.6%, 77.6%, 77.4% and 0.3% of full scale). It debayers as RGGB and says so. If red and blue come out swapped, choose the other pattern with--bayer bggr: the dimmer of the two is taken to be blue, which is a guess.
See also
- True colour: the method, the real-capture table and what is tested.
- The command line and the
CLI reference:
--colour,--white-balance,--no-channel-align. - The API:
colour,white_balance,align_channels. - Fixing a Bayer grid.