Tutorial: flatten the limb darkening
Goal: remove the fall of brightness from the centre of the disc to the limb, so that the sharpening sees the same contrast everywhere, and read the numbers that say how strong the darkening is and how well a law describes it.
Time: two minutes of work; each stack here took about 2 seconds on a GPU.
You need: a capture with the whole disc in the frame. The reference for the settings is Limb darkening; this page is the worked example.
The capture and why
15_20_57.ser from the 2022-07-17 set: a ZWO ASI482MC colour camera, 1920 x 1080,
16-bit, 100 frames, the whole disc in the frame. The owner labelled it sodium; the
analysis in #121 found it
is H-alpha (the red plane is clipped, with a prominence and filaments that match
the other H-alpha captures). Helia agrees: it chooses the H-alpha preset from the
data's behaviour and stacks the green plane because the red one is saturated.
The label does not matter for this tutorial. What matters is that it is a real
capture with a clean, full limb, so the fit has a whole circle to work with. The
project has no white-light capture of its own yet, so the numbers below are for
this band, and your own white-light stack will differ.
The captures live on the build server, not in the book. Use any of your own whole disc captures instead and expect different numbers.
1. Stack it as it is
--colour mono keeps the PNG grey so that the pictures below show brightness only.
The summary ends with the limb fit, which every run makes whether or not you flatten:
settings: H-alpha (chosen); red channel, keep 25%, alignment points 64 px
channel:  the red plane is clipped (red 98% of its lit pixels sit at the sensor limit, so the disc is flat there); stacking the green plane instead. ...
align:    phase correlation (limb fit not confident enough, 0.60); confidence mean 1.00, least 1.00 (sampled)
limb:    quadratic: u1 = 0.472, u2 = 0.046; limb at 48% of the centre; rings differ from the law by 0.66% rms
disc:    centre (788.2, 552.3), radius 444.7 px
Read the limb: line like this:
| Part | Meaning |
|---|---|
quadratic |
The law fitted (the default). --limb-law changes it |
u1 = 0.472, u2 = 0.046 |
The coefficients of L(mu) = 1 - u1 (1 - mu) - u2 (1 - mu)^2. u1 is the linear part: the larger it is, the stronger the darkening |
limb at 48% of the centre |
The law's brightness at the limb itself (mu = 0), as a share of the centre: 1 - u1 - u2 = 0.483 here |
rings differ from the law by 0.66% rms |
How far the measured brightness of each one-pixel ring strays from the law. Small means the law describes the disc; large means something else is radial in the picture (see Troubleshooting) |
2. Measure the profile on the unsharpened stack
A FITS file is the unsharpened stack, so it is the right thing to measure:
file:        plain.fits
image:       1920 x 1080
disc:        centre (788.5, 552.4), radius 444.6 px, sky 0.0080, centre 0.9084
linear: u = 0.498; limb at 50% of the centre; rings differ from the law by 0.69% rms
quadratic: u1 = 0.472, u2 = 0.046; limb at 48% of the centre; rings differ from the law by 0.66% rms
neckel: a1 = 0.441, a2 = 0.047, a3 = 0.029, a4 = 0.058, a5 = -0.090; limb at 52% of the centre; rings differ from the law by 0.65% rms
mu    measured    linear quadratic   neckel
0.90  0.9536      0.9502   0.9524   0.9561
0.80  0.9054      0.9004   0.9039   0.9071
0.70  0.8495      0.8506   0.8544   0.8556
0.60  0.8030      0.8009   0.8041   0.8034
0.50  0.7618      0.7511   0.7528   0.7518
0.40  0.7047      0.7013   0.7006   0.7014
0.30  0.6500      0.6515   0.6475   0.6526
0.25  0.6146      0.6266   0.6206   0.6288
mu is the cosine of the angle from the local vertical: 1 at the centre of the
disc, 0 at the limb. measured is the azimuthal median of the image at that mu
relative to the centre, and each column after it is a law's value there. In this
capture the brightness has fallen to 61% of the centre at mu 0.25, which is 97%
of the way out, the last ring that is fitted. All three laws follow the measurement
to within 1.5% of the centre's brightness, and no law has a ring scatter better
than another's by more than 0.04 percentage points.
3. Flatten
helia stack 15_20_57.ser -o flat-model.png   --preset ha --colour mono --flatten model
helia stack 15_20_57.ser -o flat-profile.png --preset ha --colour mono --flatten profile
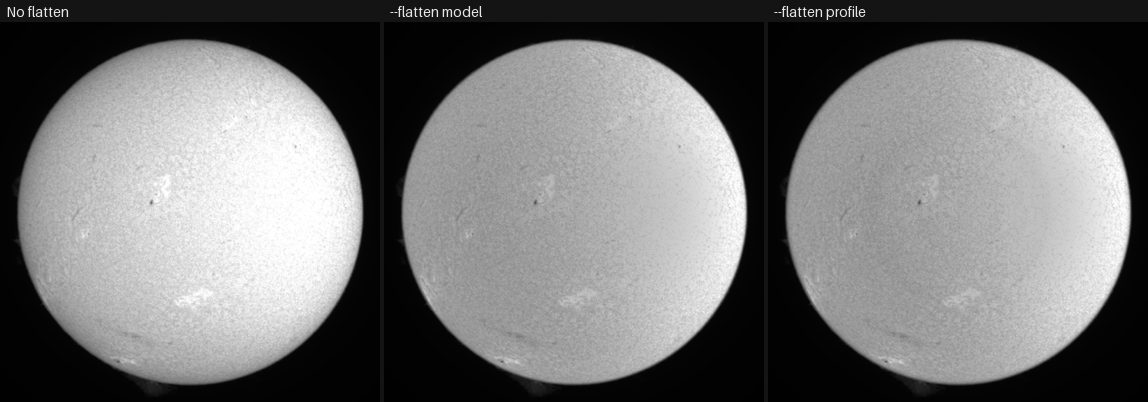
Made by helia stack as above, then cropped to the disc, reduced to 380 pixels
and set side by side. The left picture is the stack as written; nothing else was
done to any of them.
What you should see: the left disc is bright in the middle and fades towards the edge; in the other two the disc is an even grey, the mottle and the filaments are equally visible at the limb as at the centre. The overall level is lower, which is not a loss: Helia scales the gain so that the 99.9th percentile of the disc stays where it was, so that dividing out the darkening cannot push the brighter side past white. Because of that, the patch on the right of the disc (the etalon's sweet spot, a real feature of this capture and not a radial one) now stands out more: flattening leaves it, as it should.
To check it worked, measure the flattened result, using --sharpen-fits so that
the FITS file receives the edit too (see Troubleshooting):
helia stack 15_20_57.ser -o flat-model.fits   --preset ha --flatten model   --sharpen-fits
helia stack 15_20_57.ser -o flat-profile.fits --preset ha --flatten profile --sharpen-fits
helia measure flat-model.fits --limb
helia measure flat-profile.fits --limb
Linear u |
Quadratic u1, u2 |
Rings off the law (quadratic) | Disc centre level | |
|---|---|---|---|---|
| Unflattened | 0.498 | 0.472, 0.046 | 0.66% | 0.9084 |
--flatten model |
-0.000 | 0.003, -0.005 | 0.74% | 0.6499 |
--flatten profile |
0.000 | -0.003, 0.005 | 0.34% | 0.6513 |
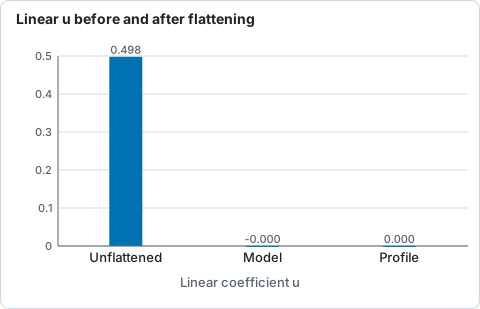
Linear u of 15_20_57.ser unflattened and after each flattening source, from the table above.
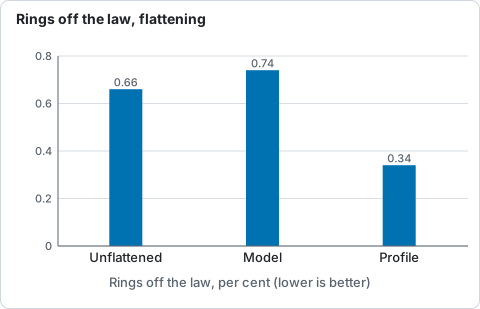
How far the rings stray from the fitted quadratic law, unflattened and after each flattening source, from the table above.
The coefficients go to zero: the disc has no darkening left. The model removes
only the fitted law (its rings stay about as far off as before, 0.74%); the profile
removes the whole measured radial profile, so any radial gradient the law could
not describe goes too, and the rings end up 0.34% off a flat line. Neither
touches the granulation or fine detail: dividing by a smooth radial function
cannot move contrast that is not radial. (On this capture the project measured
the granulation band of helia measure at 2.021% before, 2.023% with the model and
2.020% with the profile.)
4. The same in the app
- Open the capture (drop
15_20_57.seron the window, or Open). Helia names the filter it chose on the Open step. - Stack it: press Quick stack, or go to Stack and press Stack N frames.
- Go to Sharpen. At the top is Limb darkening. Press Model or Profile; the picture updates at once.
- Under Model, the chips Linear, Quadratic and Neckel choose the
law. The line under the chips is the fit that was made on your stack: the same
limb:line as the command line, with the coefficients, the limb level and how far the rings stray from the law. - Press Before / after in the toolbar and drag the dividing line to compare with the unflattened stack. Off puts the disc back as it was.
- Export as TIFF or PNG; the flattening is in the file. A FITS export is the unsharpened stack unless you turn on Edit the FITS too on the Export step.
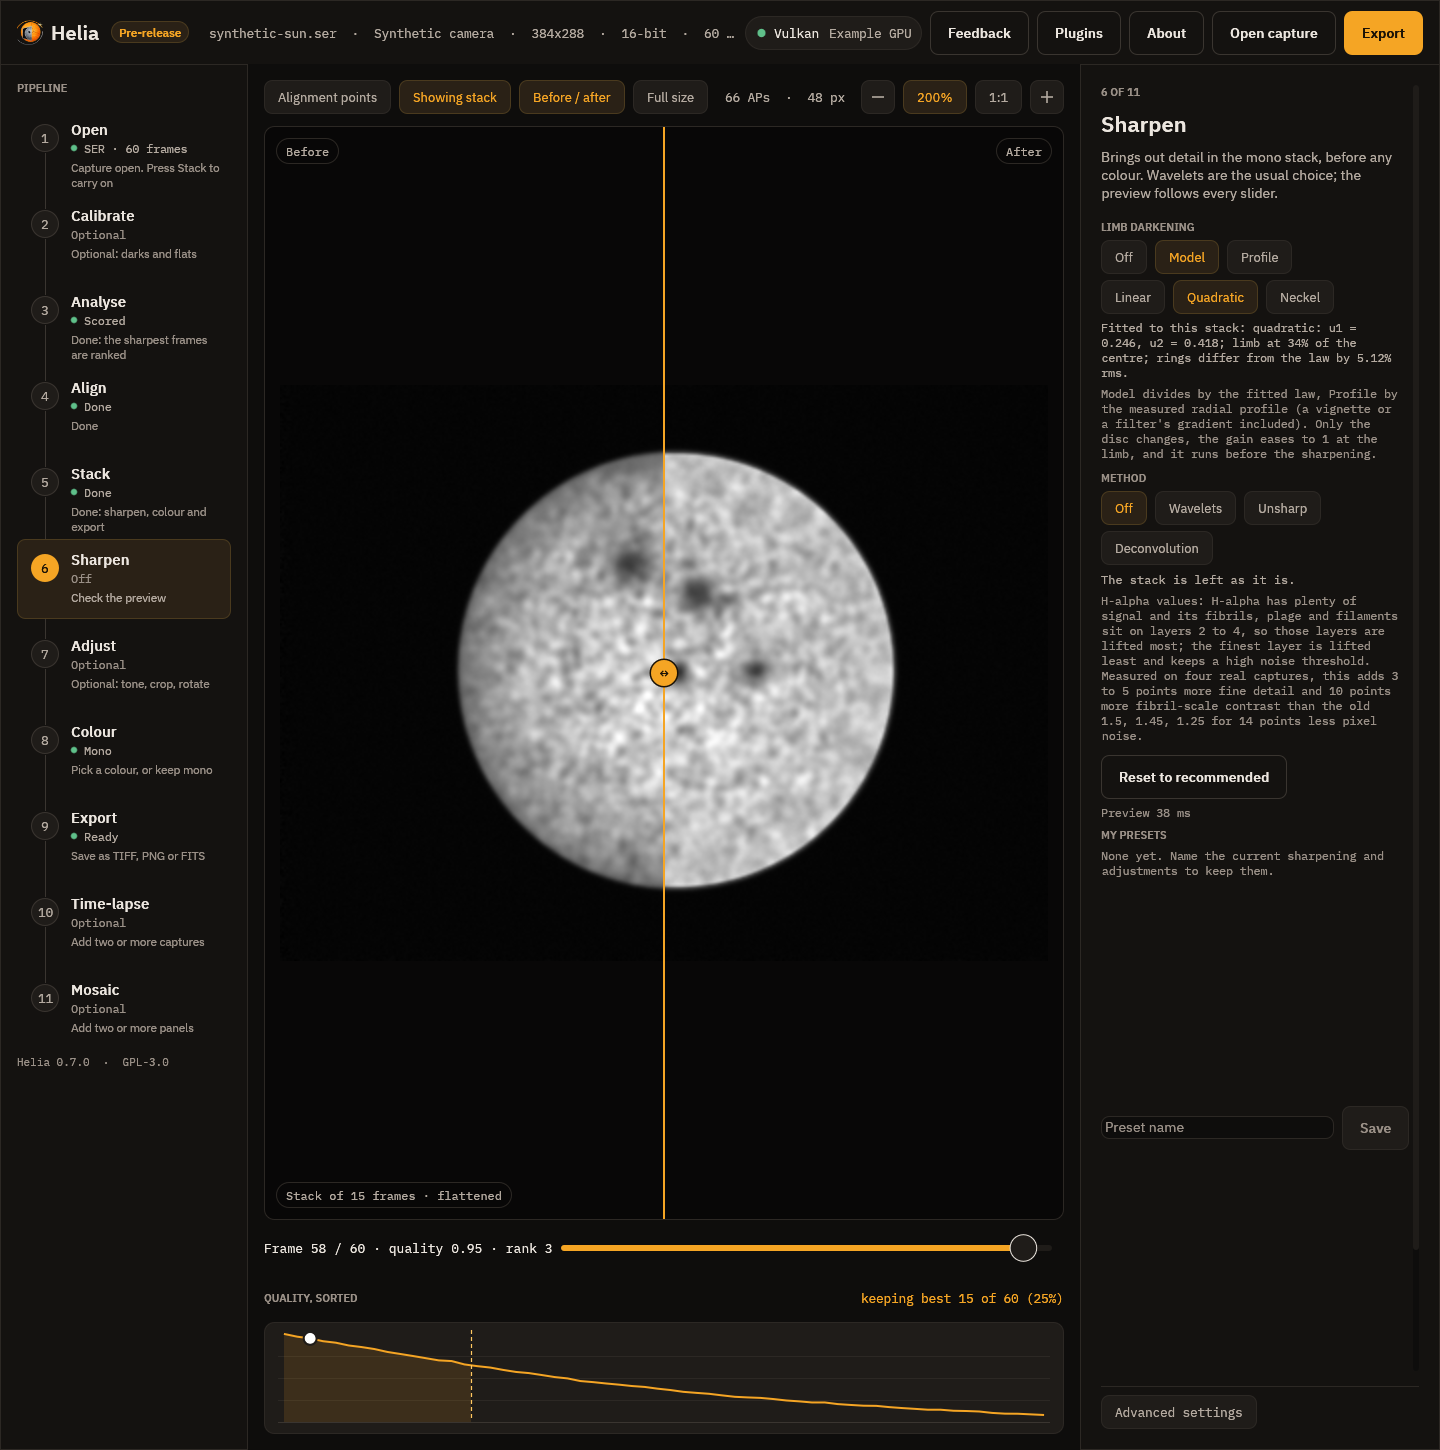
This picture is the app's synthetic demonstration capture, drawn by the interface test harness, with the fit made on that stack. It shows where the controls are; the real result is the one above.
Flatten an image you already have
helia edit takes the same flags on a finished stack, for example the FITS written
above, so you can try the laws without stacking again:
edit:     1. flatten the limb darkening by the measured radial profile (azimuthal median), on the disc only
wrote:    flat.tif (1920x1080) in 0.85s
(--limb-law chooses the law fitted and printed, and the one --flatten model
divides by; --flatten profile divides by the measured profile whatever the law.)
Which law to choose
quadratic(the default) is right for nearly everything. Two coefficients, stable on a whole disc. On this capture it explains the rings as well as the five-term law (0.66% against 0.65%).linearhas one coefficient, which is easy to compare between captures (u0.498 here, 0.539 onSun_Test.ser). It is a little too stiff close to the limb: atmu0.25 it is 0.627 where the disc measures 0.615.neckel(Neckel and Labs, five terms) is the form the literature tables use. Its terms are nearly collinear and the rings barely determine five numbers, so compare the law (thelimb atfigure and the table), nota1toa5. It fits marginally better (0.65% against 0.66%) and is no better for flattening.--flatten profileis the choice when the capture has a radial gradient that is not limb darkening (a vignette, an uncorrected flat, an etalon). It removes everything that is radial. Usemodelwhen you want only the physical darkening removed and the rest left for a flat to deal with.
How real captures compare with the literature, and the table for every band, are in What the real captures say.
What to expect and how to tell it worked
- The
limb:line appears on every run. With--flattenand a disc that fits, nothing else changes in the summary; the picture does. helia measure --limbon a flattened FITS (made with--sharpen-fits) gave coefficients within 0.01 of zero and alimb atof 99% to 101% for the linear and quadratic laws here.- The last 1.5% of the radius is left alone by design (the gain eases to 1 there), so the very edge is as it was.
- Everything outside the limb, prominences included, is untouched.
Troubleshooting
limb: no clear disc to fit, so --flatten changed nothing. The capture has no disc Helia can fit: a cropped region, a prominence frame, or too little contrast. Flattening needs the whole disc in the frame; there is nothing to fix in the settings. (This message is printed by the code; I did not have a capture that triggers it, so it is quoted, not pasted.)- I flattened and the FITS file is unchanged. By design: the FITS output is
the unsharpened stack. The run says
note: FITS is the unsharpened stack; the
  sharpening and edits go to TIFF and PNG (add --sharpen-fits to change that)
. Measuring such a FITS file gives the unflattened numbers (verified:u1 = 0.472again). Add--sharpen-fits, or flatten the TIFF or PNG. - The rings are far from the law (several per cent) and the fit looks odd. The
fit measures the image, so anything radial is read as limb darkening. Seen on
this set:
14_42_57.avi, a capture whose frame cuts the limb (63% of it visible), gavequadratic: u1 = 0.958, u2 = -0.751; limb at 79% of the centre; rings differ from the law by 2.36% rms. Au2that cancelsu1like that is not physics. Flattening such a disc is harmless but the coefficients are not a measurement; frame the whole disc, or calibrate with a flat (Calibration) if the cause is vignetting. - A bright patch on one side after flattening. Not a bug. It is not radial (here, the etalon's sweet spot), so neither source removes it, and with the rest of the disc flat it is easier to see. A flat field is the cure, not flattening.
- The disc looks greyer or darker than before. The gain is scaled to keep the brightest 0.1% of the disc where it was, so the disc cannot clip. Raise the level in Adjust (Levels or Curve), as you would for any stack.
See also
- Limb darkening: the laws, the fit and the literature.
- The command line and the
CLI reference:
--limb-law,--flatten,--sharpen-fits. - Autocrop to the disc: the next step.
- Sharpening and adjustments.